Live, Laugh, Love

Yay!  It's Friday!  Ready for the weekend!!
I started this card late last night but it got too late and I had to stop.  It's pretty simple, so it was easy to finish up quickly today.
I just love how this card turned out!  The ribbon through the punch border has got to be my absolute favorite!  I saw something like that on another blog but I can't remember what blog it was...
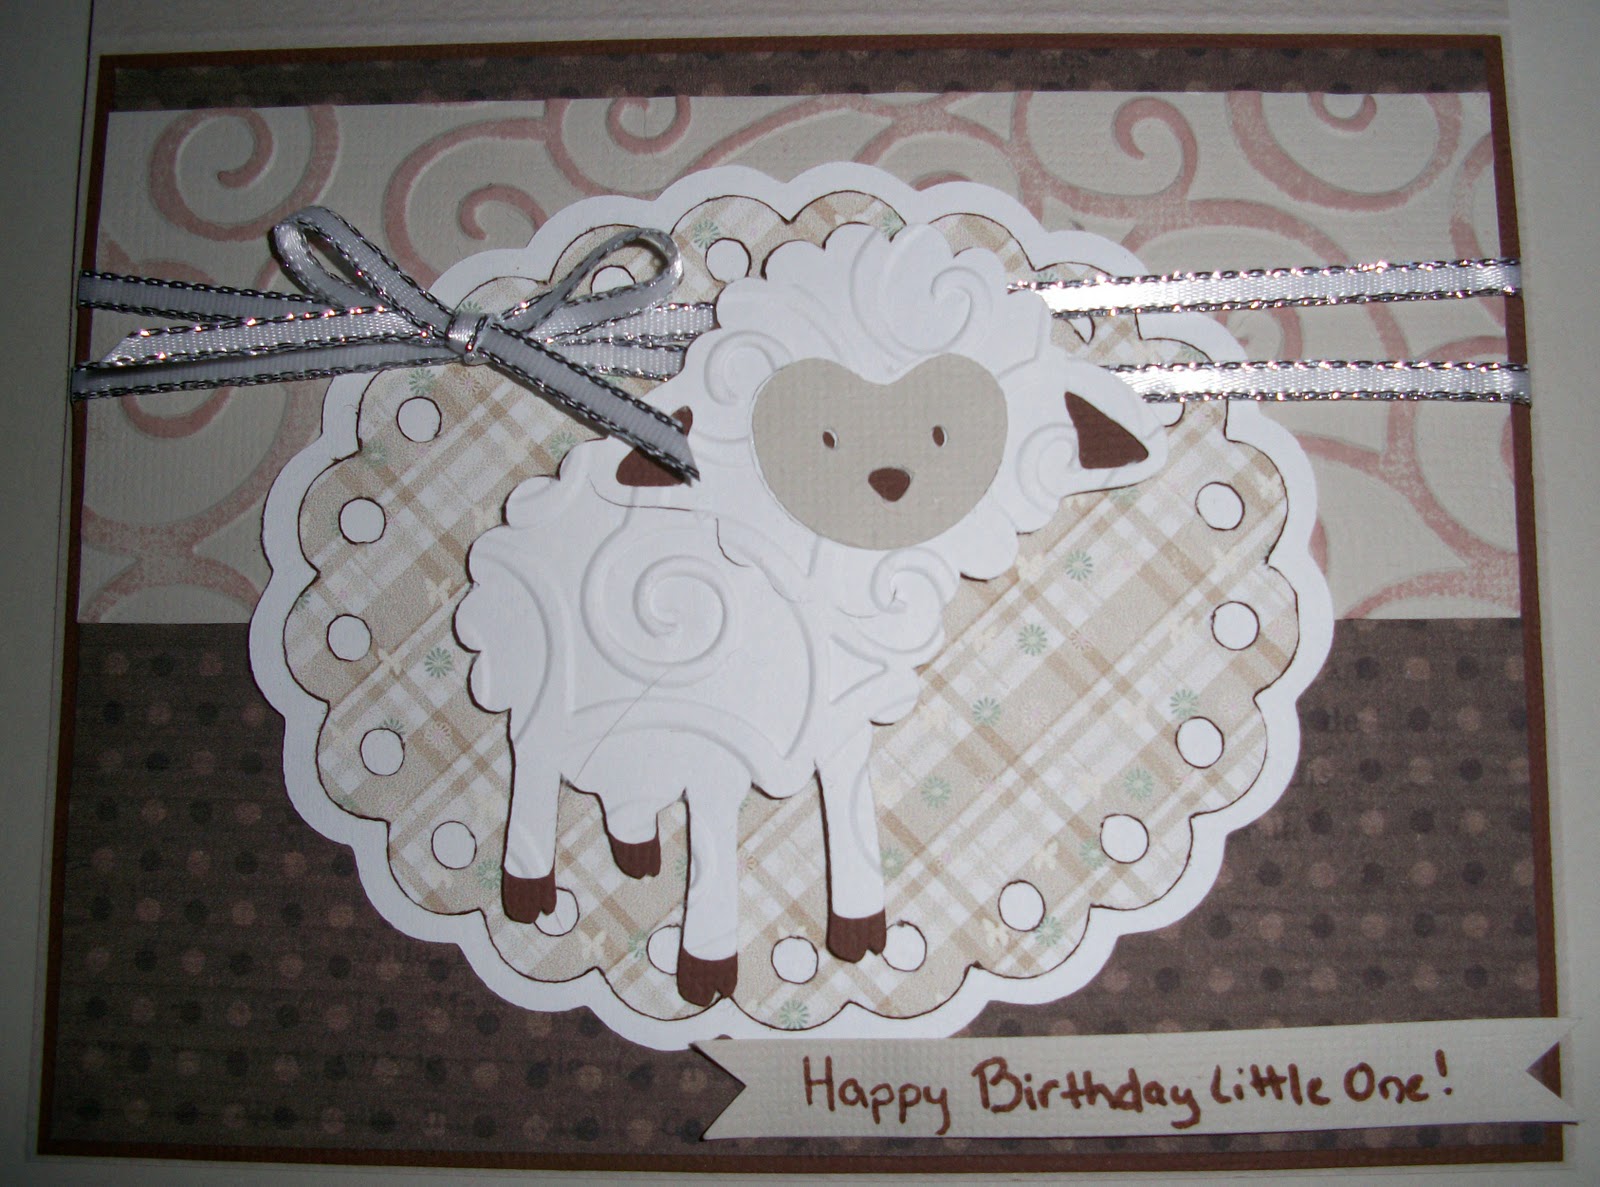
It was definitely fun stringing the ribbon through the punch and seeing it come together!  I've learned I need to work on my bows though...can't ever seem to get them to look good...
The sentiment is a free digi stamp from Bits N Bobs.  This quote seems to be very popular now days!
I followed the sketch Try Stampin' on Tuesdays has for their challenge this week.  It's a very simple sketch and I wanted to keep it that way even though I longed to add more details to this card!
The frame around the sentiment is cut from my Cricut Lacy Labels cartridge (of course! :) )  I embossed the white part of the frame with an Art Deco folder.  I've had those folders for quite awhile and haven't really ever used them!  And they are so cool!  I'll have to try to pull them out more often!
This card is entered in the following challenges:
    Try Stampin' on Tuesdays #50-Sketch
    The Crafter's Cafe-Clean and Simple
    Die Cuttin Divas #49-Buttons, Bows and/or Bling
    Ladybug Crafts #52-Bows
    Party Time Tuesdays #52-Color/Photo Inspiration (gray, white, blue)
    Crafting for all Seasons #18-Colors Blue and White
    Cardmadfairy's #25-Ribbons/Bows
    Crafts 4 Eternity #56-Clean and Simple
Thanks for stopping by!!

13 Fabulous Comments:

Hearts and Bunnies!

Hello everyone!  Hope you are having a great Thursday!
The layout of today's card is something I thought about during my workout on the treadmill this morning.  It turned out so cute!
I actually created the heart frame on my own.  As I was browsing other blogs, I saw one like this that was a die cut and I really liked it so I made my own in Sure-Cuts-A-Lot!!  The edges of the hearts are chalked with pink.  I cut out some swirls that I had also made in SCAL and attached those to the frame.  Then added my roses!  I put one larger rose at the corner and 6 smaller ones around it with green leaves attached.  The big rose is chalked with pink along with 2 of the smaller roses, and 2 small roses are chalked with red as well.  Once they were chalked, I sprinkled some clear glitter on them so they sparkled.
The image is a freebie from Meljens Designs.  It's so cute!  And perfect for Valentine's Day!
I didn't put any patterned paper behind everything like I usually do.  Since the card has pink sponging type accents to it, I thought that would work pretty good as the background.  I think it worked out.  Part of me wants to add something back there, but I think it would end up ruining the card...
To finish off the card, I added a little bow on top of the strip of ribbon, and 6 pinkish paint dots.
I just love it!  It's so cute and pretty much came together as I had imagined it :)
This card is entered in the following challenges:
    Sketches by Carly #48-Sketch
    Critter Sketch #99-3 Embellishments
    Cupcake Craft #176-All You Need is Love
    Paper Pretties Monday Challenge-Valentine Project
    Deep Ocean #17-Sparkle
    The Pixie Cottage #105-Love and Kisses
    Charisma Cardz #3-Pretty in Pink
    Paper Crafting Journey #1-Floral
    Chocolate, Coffee, & Cards #4-Glitter
    Simon Says-Anything Goes
Thanks for stopping by!

16 Fabulous Comments:

Happy Birthday Little One

Happy Tuesday!
It's wet and rainy here in Montreal...I thought it was winter??
Anyway, I made this card with the thought that it would be great as a birthday invitation!
I really like the neutral colors with the lamb.  I decided after putting this card together to use a scallop edge scissors on the embossed panel in the back and cut the edges so they weren't just straight.  But I had affixed this one down already so I left it for this card :)  It's embossed with my Cuttlebug D'vine Swirls folder and then I inked brown on top.
I cut the circle from my Cricut Lacy Labels cartridge.  The lamb is cut from the Easter 2010 cartridge and then embossed with the D'vine Swirls folder as well.
I hand wrote the sentiment on a banner.  It's hard to see in the picture but I left the middle of the banner popped up off the card so it looked a bit wavy, but it didn't photograph well...
This card is entered in the following challenges:
    A Gem of a Challenge #38-Sketch
    Fantabulous Cricut #95-Label It
    Art Impressions #48-A Card for a Child
    Charisma Cardz #2-Clean and Simple
    2 Sisters #75-Embossing
    Dream Valley #24-Animals
Thanks for stopping by!

14 Fabulous Comments:

I Love You Hearts

It's been a pretty quiet weekend here for me...I was lacking a little inspiration which was pretty discouraging but my wonderful husband helped me out :)
I worked on my rose making process yesterday so that it was a little bit quicker and easier, even though they were pretty easy to begin with.  But now they stick together a little better!
So today I made a card to go along with my new roses, and I threw in a daisy for fun!
The circle is cut from the Cricut Wild Card cartridge.  I cut the birds from the Holiday Cakes cartridge.  The pink and brown heart is a cut file I downloaded today from Birds Cards.  It was fun going through that whole blog and looking at all the cut files and images she had on there.
I cut out some flourishes in pink and brown.  Then added 3 of my roses and 1 daisy.  There are 3 layers of ribbon behind everything, 2 white ribbons and a pink.  It was fun making this card!  I love how it turned out.
This card is entered in the following challenges:
    Card Patterns #149-Sketch
    Celebrate the Occasion #46-Use Polka Dots
    Pixie Dust Studio-We're Going Dotty
    Raise the Bar #88-"Ring" in the New Year (use circles)
    Stamp, Scrap and Doodle-Have a Heart
    Stampin' Sisters in Christ #123-Make a Heart Stand Out on Your Project
    Totally Stampalicious-Valentine's Theme
Thanks for stopping by!

7 Fabulous Comments:

Congrats Wedding Card

Happy Friday to everyone!  This week has been so full of wedding stuff that I decided to make a wedding card!
How cute!  I just love how it turned out!  I debated with the heart border on the side...there were more hearts on it but I trimmed it down and that seemed to help it fit better with the card.  I love when cards turn out so well!
The image is Forever from Pixie Dust Studio.  It's such a sweet image!  I just absolutely love it.  It's colored with colored pencils and then I added a little heart doodle around the edge.  The frame is cut from the Cricut Holiday Cakes cartridge.  I staggered the black and red layers so that they both framed the image.  I think that worked out pretty good.  The heart border is cut from the Love Struck cartridge.
I double embossed the back frame with the D'vine Swirls folder and then clear embossing powder.  It's hard to see in the picture, but now it has a shine over the swirls and adds a bunch to the card.
Then I added my roses!  These are easily my favorite embellishment right now!  They are easy to make, which is great because then I can pump out 6 of them quickly to put on my card :)
Added the Congrats tag as the finishing touch!  Oh yeah, there is a thin black ribbon in there too :)
This card is entered in the following challenges:
    Mojo Monday #224-Sketch
    By the Cute and Girly-New Beginnings
    Digital Tuesday #143-Romantic Card
    My Time to Craft #171-Your Favorite Embellishment (the roses :) )
    Ruby's Rainbow #20-Valentine or Red/Black
    Crafty Ribbons #11-Love is Red and Black
Thanks for stopping by!!

6 Fabulous Comments:

Life is not measured...

I can't believe it's Thursday already!  I have been spending most of my time this week looking at wedding invitations and getting ideas since one of my dear friends asked me to make her invitations!!  I'm soooo excited!!
But I had to get some cards made this week :)  I just love my job!
This card turned out so beautiful!  I struggled choosing what patterned paper to use in the background.  I really wanted to do a black and yellow color scheme, but I didn't have any paper that I liked.  But I had this awesome orange/yellow butterfly paper that I purchased on clearance at Ben Franklin quite awhile ago.  Since the sentiment had a butterfly on it, figured I would give the combo a try.  I LOVE it! 
The purple hibiscus are from the hibiscus font, but the leaves are from the Cricut Tie the Knot cartridge.  I chalked the insides of the hibiscus with some orange and then added some yellow 3D paint to the tips so that it didn't blend in with the circle...since they are cut from the same paper.  The circle frame is from my Lacy Labels cartridge, I just love that cartridge!!  It has every frame I could ever want and I think I have used it on almost every card I have made since Christmas!
The scallop on the edge is from Holiday Cakes and I added some yellow 3D paint to that as well.
I wanted to add a bow and some other embellishments, but I feel they would get lost on the card or it would become too cluttered.  So I left them off :)
I'm really loving the orange and purple color combination.  Orange has become one of my favorite colors so it's nice to play around with it and see what can be done.
This card is entered in the following challenges:
    Card Patterns #148-Sketch
    The Pink Elephant #131-Favorite Colors
    Cards TV #100-It's June in January (Summer as the theme-Butterfly's are summery, right?)
    Sentimental Sundays #85-Ribbon
I also wanted to announce my excitement for being top 3 at Try Stampin' On Tuesday with my Pink Hearts card!!!  Check it out: Challenge #48 Top 3
Thanks for your support and for stopping by!

3 Fabulous Comments:

Pink Hearts

I hope everyone is having a great weekend!  It has been busy for me!  I decided to challenge myself this weekend!  The goal was to make 5 cards using roughly the same elements and come up with 5 different layouts.  I think I did pretty good!  The first card I made I was not very happy with...but the other 4 I just love!  Here is one of them, I think this was number 3 in the group:
Isn't this awesome!?  All of the cards have: the same pink border and dotted patterned paper, swirls of some sort, two-tone hearts, and the scalloped circle.
The hearts and scalloped circles are cut using the Cricut Lacy Labels cartridge.  The swirls on this card are also cut from the Lacy Labels cartridge, but they were a part of a frame so I used my knife and cut all the frame/flower details out of it so just the swirls were left.
The scallop border is from the Holiday Cakes cartridge.  I printed off the striped pink paper, then added a ribbon, some 3D paint dots for details and it's all done!
It's simple but so pretty!
This card is entered in the following challenges:
    Try Stampin' On Tuesday Challenge #48-Sketch
    Simon Says-Spots and/or Stripes
    Art Impressions #47-Pink, Pink, and More Pink!
    Pixie Dust Studio #109-Put Your Heart Into It!
Thanks for stopping by!
Here are the other 3 cards (not including the one I wasn't fond of :) )


6 Fabulous Comments:

Birthday Wish

TGIF!!!  I wish everyone a wonderful Friday!  It is snowy and cold here in Montreal, but absolutely beautiful!
I made a birthday card to share with you today.  You can never have too many birthday cards sitting around!!
I had a little trouble getting this card all together...I was using the sketch design at Mojo Mondays challenge blog:
But once I got the candles cut out, I realized they were too big for a portrait oriented card...so I had to flip it to landscape and that ended up changing a bit of the layout...but I think I followed the sketch pretty closely...just instead of circles look for squares :)
I embossed half of the green backing with my Swiss Dots folder and then inked it a little with a dark green ink.  All of the frames are cut from my favorite Cricut cartridge-Lacy Labels!  The candles are cut from the cartridge Birthday Bash that I got for Christmas from my wonderful mother-in-law (turns out we gave each other the same gift...lol!)
I had embossed the lower corner of the blue paper with a Celebrate folder, but it didn't turn out as nicely as I wanted it to...hard to see in the picture.  The sentiment is a digi stamp from my collection.  I thought it worked pretty good as a "tag" under the ribbon.
This card is entered in the following challenges:
    Mojo Monday Sketch #223
    Fantabulous Cricut #93-Man Time
    Charisma Cardz #1-Happy Birthday
    Birthday Sundaes #38-Birthday Card
    Kaboodle Doodles #101-Fireworks/Celebration (I went the celebration (birthday) route :) )
Thanks for stopping by!!!

11 Fabulous Comments:

Cuddle Bunnys!

This has been a fun week for me!  I've been completing cards like crazy and it feels so good!
Here's another Valentine card for you!
I loved this digital image when I downloaded it last week from TLC Creations!  And after making my black and white card, I was stuck on the monochrome theme so I thought I would do browns with a little red...I don't know if it worked out quite as well as I was hoping...I think the white in the middle of the hearts throws a lot of the color scheme off...I should have made that a different color but wasn't sure what...I didn't think a shade of brown would work well in there...and I didn't want to use pink...what do you think?
The hearts are cut from the Cricut Holiday Cakes cartridge and I cut them apart so they were separated and I could spread them out.  The brown frames are from my new Lacy Labels cartridge (I love my husband for buying that for me :) )  The swirls in the corner are from the Storybook cartridge, but I forgot to flip the one on the right...oh well :)
I added some white 3D paint dots to everything for added details, and in hopes that it would help pull the white from the hearts through the card...not sure it worked.  The gold/brown ribbon was a snag at Michaels after Christmas for 75 cents!  And the spool came with 2 other colors!!  Love that :)
This card is entered in the following challenges:
    Card Patterns Sketch #147
    Send A Smile 4 Kids-Valentine for a Kid (I just came across this site and I would recommend everyone check it out.  They collect and distribute cards for kids that you make and send them!  The cards go to children that are inpatient at different children's hospitals!  How wonderful!  Please check it out and participate if you can!)
    Ladybug Crafts #51-Use Your New Stash
    My Time to Craft #170-Hugs and Kisses
    Clearly iStamp #42-Valentine's Day
Thanks for visiting!!

10 Fabulous Comments:

I Love You Ladybugs!

Happy Tuesday!  I hope everyone had a great day!
Here is a super cute ladybug card for you:
This is actually version 2 of this card.  I made one yesterday with pinks and reds, similar sketch pattern, and same image...but I didn't like it as much as I loved this one!  The Paper Variety's challenge this week is black and white with a kiss of color. I might have used more than a "kiss" of red, but I think it is just enough to pop!
The ladybugs are a freebie digi stamp from Lily-boo's Boutique.  They are printed 3 times, 2 are glued together to make them sturdy.  I glued one layer down and them used mounting tape to pop the other 2 up.
I used my new Cricut Lacy Labels cartridge for the frame!  I just love that cartridge!  There are 3 layers of ribbons at the bottom.  I really liked the white ribbon because I felt it matched the frame really well...but it got lost in the white background without something behind it.  So I used a wide black ribbon as the backing, and then I found some Valentine heart ribbon I bought last year to layer on top of the white.  I think it worked out pretty good.
The last item I added was the roses!
These are probably my favorite part of the card!  I've been making a lot of these lately and they are just so beautiful!  They always add so much to the card.  I put some glitter glue around the petals so they sparkled a little bit.  Cut out some swirls and added a few silver paint dots so that they didn't blend into the background too much.
Then I decorated the inside!
I've really be trying to improve my decorating on the insides of my cards.  I never used to do that so it's new to me.  But I think I'm getting better :)
This card turned out so cute!  I just love it!  Ladybugs are always so cute and they just work perfectly on this card!
I'm entering this card in the following challenges:
    Sketch Saturday #189-Sketch
    The Paper Variety-Black, White, and a Kiss of Color
    Lexi's Creations #56-Anything Goes
    The Pink Elephant #130-Hearts
    Art Impressions #46-Anything Goes
    CES Challenge #67-Anything Goes
    Dream Valley Challenges #23-Anything Goes
Thanks for looking!

8 Fabulous Comments:

Congratulations Card!

I hope everyone had a wonderful Christmas and is having a great start to the new year!!  It has been great to get back to my crafts and my regular routine!  But it was also great to take a break and see family for a week.
The card I made today turned out so cute!!
I love the blue color scheme!  And the little birdie digital stamp is just so cute!  I printed him off twice and colored him in blue with a few green feathers for accent.  I embossed the back border with my Spellbinders Flower Silhouette template and then inked some blue on the details to help them stand out.
I tried something new with the sentiment.  I printed it first and then used my new Cricut Lacy Labels cartridge to cut out the frame.  I was surprised that it worked out on my first attempt!  It's even centered in the frame!! The floral embellishments are also cut from the Lacy Labels cartridge.  I glued some jewels in the center of the flowers and inked some dots around the swirls for accents.
I also decorated the interior.
I just love this card!  It was a great way to get back into my cards!
I'm entering this card in the following challenges:
    Sketches by Carly #47-Sketch
    Through the Craftroom Door #17-Monochromatic
    Critter Sketch Challenge #96-Celebration
    Party Time Tuesdays #49-Something New
    Simon Says-Something New
    Digi Designs Challenge-Show Us Something New
    Pixie Dust Studio #108-Mono-tize it!
Thanks for stopping by!!

9 Fabulous Comments: